Allscripts TouchWorks EHR – Underutilized Time Savings Features
The other day my father, a music fanatic and Smartphone user, was talking about how great it would be to have the radio on his phone; I chuckled and said “you can have a radio; you just need to download the app.” That made me think about Allscripts TouchWorks EHR and how there are so many components that are underutilized, or not used at all. Similarly, there are Smartphone users that aren’t aware of the full potential of their phones; there are End Users that are not cognizant of all the features that make TouchWorks EHR so remarkable. Throughout my experience as a consultant, there are some common modules that are misconstrued or simply not implemented. Below I’ve outlined a few of the features that aren’t always employed but can be advantageous, especially in a busy physician’s office.
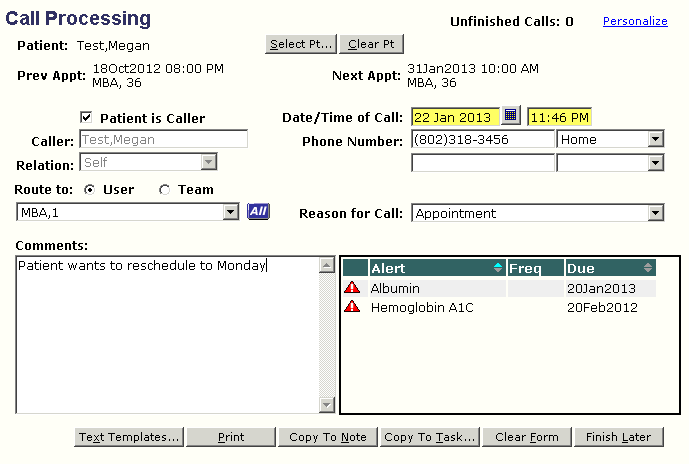
Call processing – This is a great feature that can benefit any practice currently using TouchWorks EHR. There is minimal effort needed to implement it.
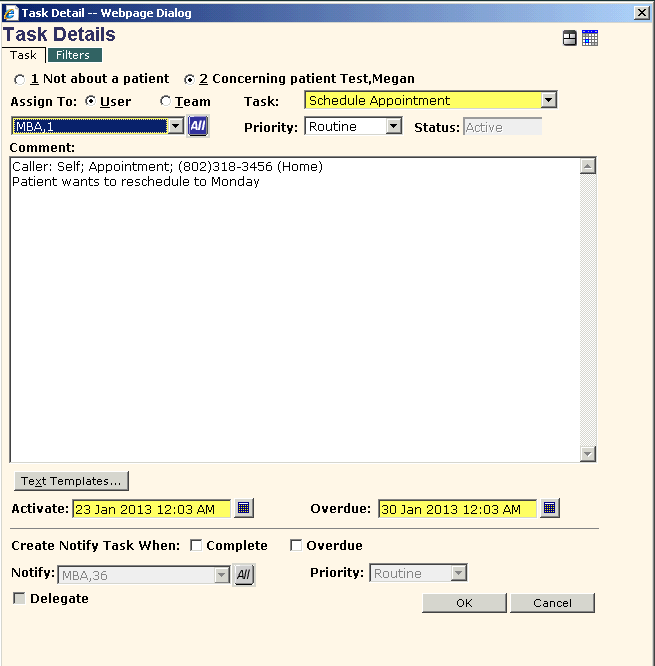
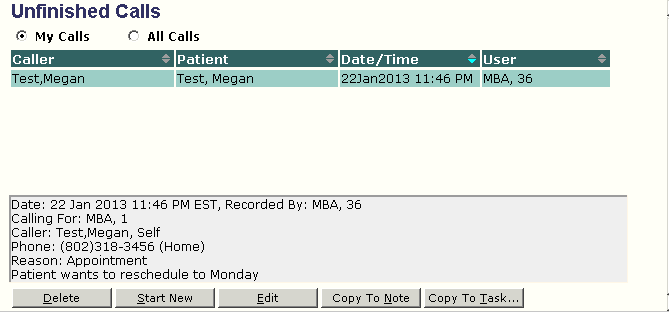
How it works: When a call is received, the end user simply searches for and selects the patient the call is about. The end user will instantly be able to view the patient’s next appointment and health management alerts. This is a great advantage because it enables the user to remind the patient if they have an upcoming appointment, medications that might need renewal or lab tests they need to complete. The time of the call is recorded and if the patient is the caller, most of the information required to document the call is automatically populated within the Call Processing page. If the caller is not the patient, the user can fill out the caller and phone number fields then select the relation of the caller to the patient. Next, the end user would select the Reason for call; this list can also be customized to fit the practices needs. The comments section can then be filled out detailing the call by free texting or by using a text template. Finally, the end user can choose to Print, Copy to Note or Copy to task. If tasking, the “Route to:” field can also be selected which will carry over to the task. If there is another call or the call is interrupted, the end user can choose to finish the call later. All recorded documentation is saved and can be completed at another point in time. This is a great feature especially if there is one person working the front desk. Call processing enables the front desk staff to partially record a patient call, place the patient on hold, check in or check out another patient and return to the call without losing any information.
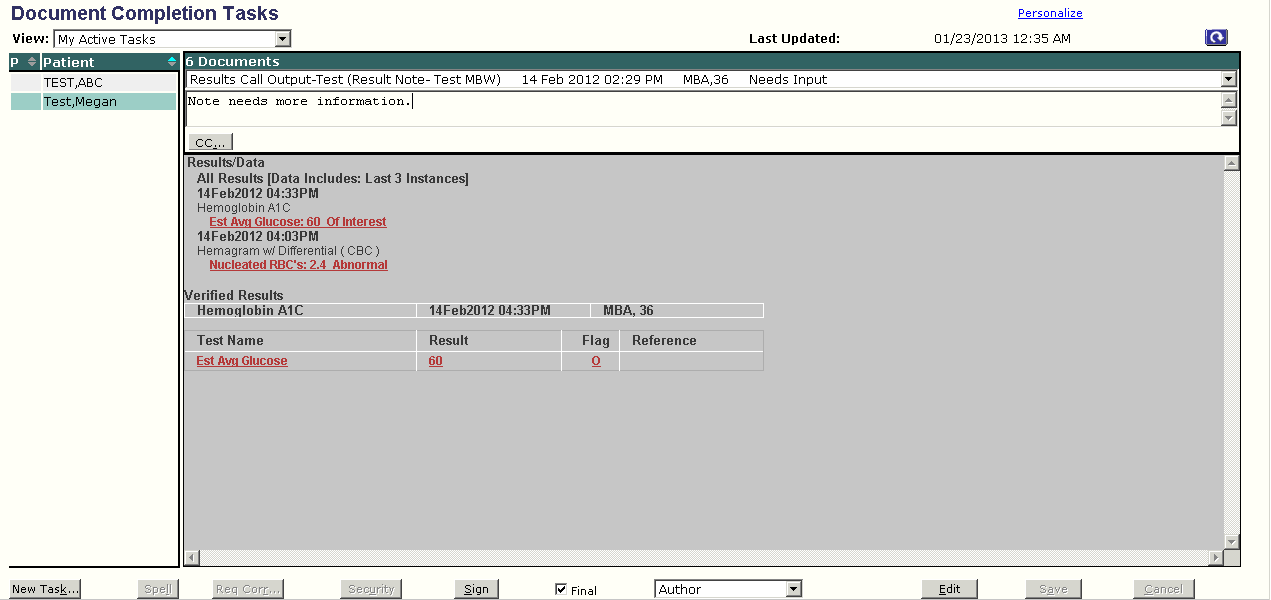
Batch Sign – This feature provides end users the ability to quickly review multiple notes and documents that require their electronic signature, by entering their user password once and requiring just one click to sign each subsequent document. The alternative is to rely on the tasks generated on the end users task list which would require multiple clicks to view and sign one document. Bottom line: Batch Sign can be a major time saving feature.
How it works: Patients that have documents requiring the user’s electronic signature are listed in the left side of the workspace. Once the end user selects the patient, the documents are listed in a dropdown menu at the top of the screen. The document selected renders in the Document Completion Tasks workspace. Once the document has been reviewed, the end user clicks the Sign button, which will open the note signature page for the first document. After signing the initial document, each subsequent document will only require the user to click the Sign button. End users also have the ability to carbon copy the PCP, referring provider or the patient by selecting the CC button.
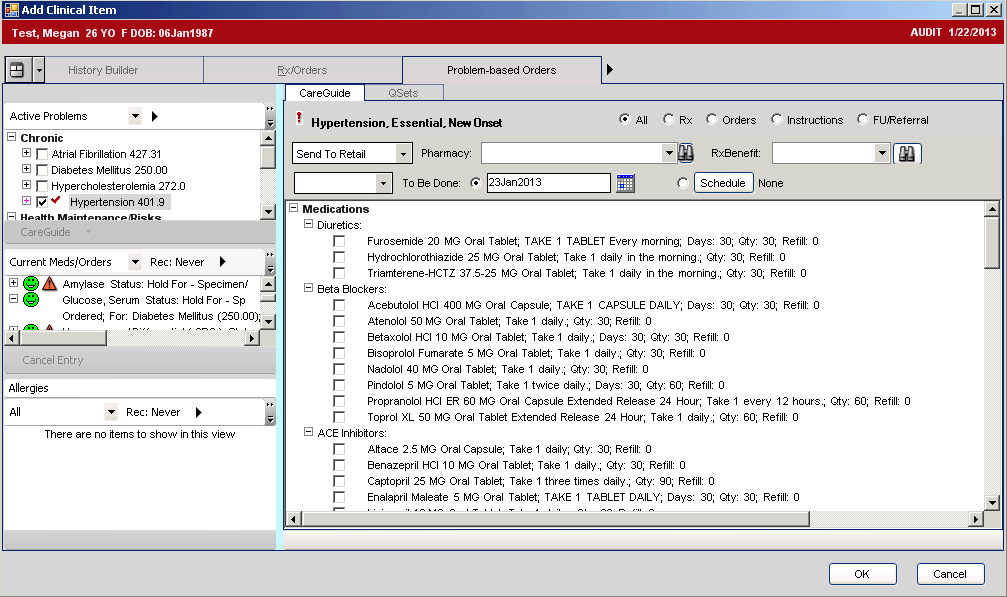
CareGuides – Although CareGuides are not available for every problem, most common problems that account for the majority of patient visits are linked to a CareGuide. Once a problem is linked to a CareGuide, patient education material is automatically generated in English or Spanish based on the patients demographics. End users can easily navigate through the order sets derived from published guidelines without having to search through the ACI, or Add Clinical Item, workspace for prescriptions, orders, and follow-up items. Basically CareGuides, whenever available, make the ordering processes quick and painless.
How it works: Select a CareGuide once the patient’s problem has been added, the end user will right click on the problem and then select CareGuide. If CareGuide is grayed out then it is not available for that particular problem. There also may be multiple CareGuides available based on type. Once the user knows which CareGuide to select, click on it and the ACI will open to the problem based orders tab with a list of orderable items available for selection sorted by order type. The end user can then filter the list further by using the radio buttons in the upper right of the window. Next, check the box of the orders to be placed. End users can also create a personal template that will save the selections made so that the next time they use the CareGuide the designated items will already be selected. CareGuides allow users to create a comprehensive plan of care with very few clicks.
Order reminders – This is one of the tools that providers tend to underutilize. If order reminders are properly utilized, end users are alerted when items regarding a patient’s disease management and health maintenance are near due or overdue, allowing them to directly act on the alert from the Clinical Desktop or Encounter Summary. End users can easily create a new order from the order reminder.
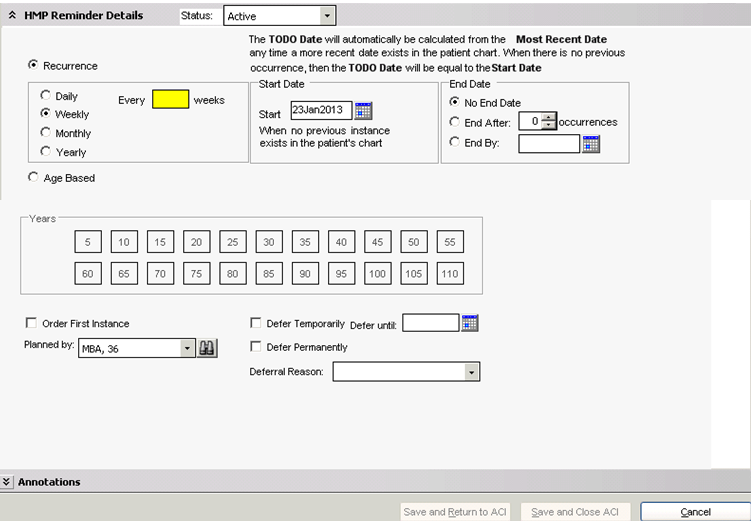
How it works: Like everything else in TouchWorks EHR there are a few ways that the end user can create an order reminder. The easiest way to create an order reminder is through the use of a CareGuide; selecting an order reminder in a CareGuide only requires one click. Both of the other options lead to the Health Management Reminder Details. An order reminder can be created from the ACI by right clicking on the order the end user wishes to create the reminder for and selecting reminder. An order reminder can also be created by navigating to the Health Management View of the HMP or Health Management Plan component, and right clicking in the To Do column and cell of the particular item the end user wishes to create the reminder for then selecting reminder. Once the Health Management Reminder Details display, the end user can fill out the required fields as they feel appropriate and then save the reminder to the patient chart. If the user wishes to order the first instance of the orderable item, check the box next to “order first instance” at the bottom of the details page. Once the reminder is saved the order details will display. To view all order reminders navigate to the Reminders/Alerts view in the HMP tab of the Clinical Desktop.
If your practice does not use these features and would like more information on how to fully utilize Allscripts TouchWorks EHR please contact us for more information on the various services offered by MBA HealthGroup.
Megan Wainer
Implementation Consultant, MBA HealthGroup

